Finding the best ramps for sheds sometimes seems like an almost impossible task, but the solution is sometimes quite simpler. Sometimes you just have to build your ramp. But how do I do that? You may find yourself asking that question. It’s relatively easy, and for that reason, we have prepared a step-by-step process for you to begin your DIY project.
We will begin by stating that this ramp we are building today is an almost common one for sheds, with 14″ of height from the ground to the shed floor. There are many types of ramps with varying degrees of height and wideness, but we believe this one will suffice enough for your daily usage.
Step one: The tools and materials
For your DIY project you will need the following:
- Miter or Table Saw
- Hand Saw
- Drill/Bits
- Pocket Hole Jig
- Chalk Line Tool
- Tape Measure
- Pencil or Pen
- Level (preferably 4 feet long)
- PT 2X6X18 feet
- PT 2X8X8 feet
- Deck Screws (preferably 3 inches long)
In this part, you will also need to check if your Pressure Treated Wood is acceptable for in-ground contact (UC4A, UC4B, or UC4C)
Step 2: The planning
You need to know specifically why you’re building this ramp. You’re not just building it as a pretty accessory. It has to be functional, and it has to serve a purpose. Will it be for heavy equipment like motorcycles and lawnmowers? Will it be for accessibility issues like being able to walk in? In our case, we will build a ramp made to be strong enough for a lawn mover to go in and out without a problem. This is great since you can still have access to the shed while also making it wide enough for a small vehicle to go in. Remember to measure your shed so that the ramp isn’t bigger than the thing, though.
Step 3: Foundation
Sometimes we have to build a foundation that covers both the shed and the ramp. Why? Because some things like slopes or uneven grounds must be fixed before building the ramp. Otherwise, the whole structure can be in danger of not functioning properly or, in worse cases, crumble under the weight.
A common way to build a foundation is using the PT 6x6s around the shed, creating a frame of sorts. The layout would be then two 16 feet long 6×6 used for the front and read and 10 feet long 6x6s for the sides. Then, you double up the low side while placing the other side close to the ground level. In total, you would have an 8-inch height between the ground and the shed. You ty everything together with lag bolts and #3 rebars. You drill holes through each 6×6 with 3 to 4 feet of space between them for the bolts. As for the rebars, you hammer them through the 6x6s for extra stability.

Once the frame is done, you add in 4 cubic yards of gravel, the crush and run kind of. You smooth it in until it is turned into a leveled surface for placement.
Step 4: Angle
Choosing the angle of your ramp is a vital decision since you must choose considering the weather and other physical attributes. The Winter season and humid conditions should make you consider how high you will make the slope. Another reason is that if you plan to use the ramp for vehicles, it should be functional enough to damage your equipment. The minimum ramp incline is 1 inch of the rise and 4 inches to run.
A great wait to calculate the angle you may need is this small formula:
Tan (Angle) = Opposite/Adjacent (use it with a calculator for easier understanding)
Step 5: Strength
The four 2x6s joists are far more adequate to carry the lawnmower’s weight and or another small vehicle. As for the span between the joists, 22 inches is adequate for the ramp considering the deck we have built. A simple math calculation to run the numbers should be enough to verify the veracity of this step.
Step 6: Foundation, shed, and ramp
Shed basics
The shed floors we know have 4×4 joists attached to the skids. The skids are those that sit on the gravel base we described prior.
Ledger board
Attach the ledger board to the front of the shed making sure there is enough room under the door for clearance. The recommended distance is between ⅜ to ½ inches. The larger the gap, the larger the bump at the end of the ramp.
Ledger board attachments
Cut down 2×8 PT to meet the ⅜ inch gap. These boards rest on the 6×6 and are attached to the shed with a 3-inch deck screw.
Joist Support
You have a few options for this part. You can either tie the ramp joints to the ledge or notch the joist rails. The latter option saves you time, approximately an hour of cutting notches.
Ramp Joist
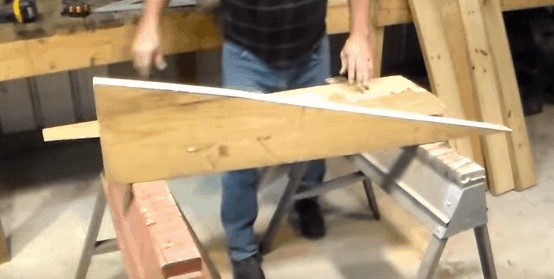
Use 4 joists for the ramp spaced at 22 inches apart from each other. This creates clearance and allows for 2 inches to overhand outside for the deck slats. For each joist, cut the angles then cut the notch to rest on the 6×6. Creating a template can make this process faster.
Dig
Dig out the spaces for the joists and end piece. The wood therefore will be on the ground.
Level check
Imperative step or otherwise your ramp will be useless. Place a wood plank on top of the woods and then place a level on top of it. Check the angel is correct between the shed and the joist.
Add End Piece
Pull the boards out of the pre-drilled holes to add the board to the end. Use deck screws for attachment.
Another level check
Do another level check.
Joist Attachment
Drill holes into each joist. Then use screws for attachment.
Back Fill the Holes
Use the dirt dug around the area to fill in the areas around the joists.
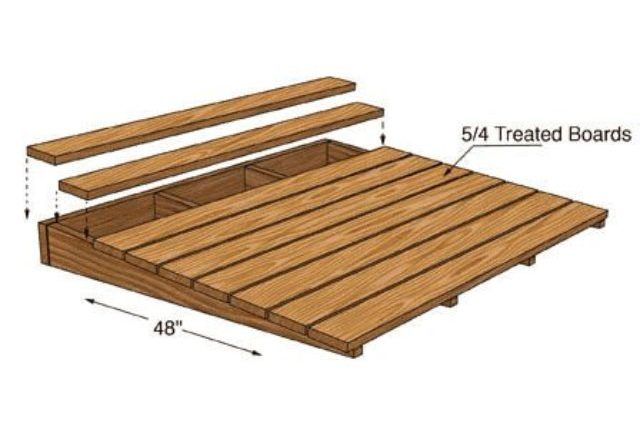
Slats
Cut the 2x6s to your desired width. A preferable width would be 72 inches. Then before screwing them on, do a quick fit check, If the wood’s width is good, start to mark where the joists are located with chalk. This is so that you can screw in the slats by the joist locations. As an extra step, you can cut the last slat with a 10.5-degree angle.
Once you have done that final step you’re completely done. This whole project can cost not higher than $100 and can be made pretty easily. If you ever feel lost, there are many videos on Youtube that go into more details about each step. Also, if you want to learn more about our related topics, visit our website. Have fun creating your DIY ramp for your shed!